IRC Tutorial
Posted: July 4th, 2011, 1:55 pm
Welcome to our IRC Tutorial. This document is designed to help you get running and familiar with our IRC channels, hosted on synIRC.
What is IRC?
IRC stands for "Internet Relay Chat", and is used to represent chatroom networks where people from all over can get together. Many networks have multiple servers, giving the users multiple sites to connect from. To connect, you need an IRC client, of which there are many. This tutorial is about mIRC, a shareware program. After a month you'll need to click past annoying "buy me" menus but it will still function. There are other IRC clients you can use.
Why IRC?
Sometimes less is more. IRC has been around for over a decade and will probably stick around for a lot longer because it uses so few of your computer's resources. This means most users leave it running as long as their computer is on, and people can chat live or in effect "leave messages" for others to read later.
How to Install mIRC
Installing mIRC is simple. Simply download the file from http://www.mirc.com and run it. The install file asks you for the directory, defaulting to C:\Program Files\mIRC, and that's it! Everything else is automated. If it seems too complicated for you then following will help you.
But if it seems too complicated for you then following will help you.


Connecting to IRC
Connecting to IRC is almost as easy as installing it. When you first run the program, the options window pops up with a small form to fill out.
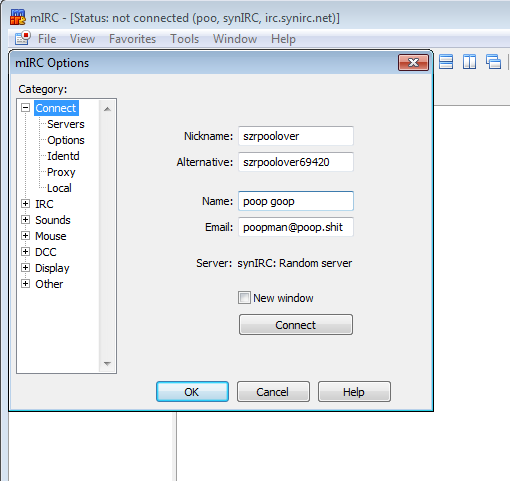
In the box where it says Full Name, just enter your first name, or perhaps a character name. This isn't displayed, but it's a good precaution to not put much personal information into these windows. The same carries for the E-Mail Address box.
Finally, you have the Nickname and Alternative boxes. These are what control the name you appear as, so pick whatever you want. If someone already has the nickname you put in the first box, mIRC will try to set you to the alternative. If neither work, it will prompt you for a different nickname.
At the bottom of the menu is a checkbox labelled Invisible Mode. Basically, this has to do with people being able to check if you're connected without knowing your nickname, like listing all the nicknames on the server. We suggest you put a check in this box, just for privacy and security.
Click OK to get out of this menu.
Now you'll be staring at a window that is prompting you for a command. This is called the Status window (or Server window once you connect)
Type /server irc.synirc.net to connect to the correct IRC server. You'll see a lot of messages produced by IRC and some sent by the server to you as the "message of the day" if you connect.
You may also get this:
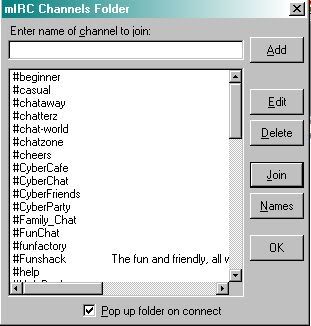
Uncheck "pop up on connect" and hit OK to get rid of it.
Now that you're connected, if you want to see a listing of the channels currently open, type in /list , but since you already know the channel name, you don't have to do that. The command to join a channel is /join #Channel Name. Remember the pound sign # as all channels are preceded by this.
Try it out by typing /join #SZR
If you try to join a channel that doesn't exist (has 0 members) the channel is created for you. You can use this to make a new channel to chat in, and invite others to come chat with you.
Nickserv
synIRC has a feature called Nickserv, which allows you to 'register' your nickname, so nobody else can use it. The command to do this is /msg nickserv register password email . It's important to use a password you'll remember, and to put in a real email address. You'll need to check your email and verify your address to finish registration, and if you forget your password, they'll use that email address to send you a reminder.
Once you register your nickname, you'll have to identify yourself every time you log in or change your nickname to the registered one. The command to do that is /msg nickserv identify password . Once you do that, you'll get a message that tells you you've been identified.
To prevent the nickserv from becoming filled with unused old names, if you don't log on for an extended time span there's a good chance that your nickname will be reclaimed, and you'll have to register it again.
Other Useful Commands
IRC has a vast range of commands and abilities, but most of them aren't needed by most of us. There are a few that are important to know though, and you might find yourself using a lot.
/me does stuff
It's like an IRC emote. * Virgil throws a large rock at Marduk
/nick nickname
Changes your nickname
/part
Leaves the channel you type it in
/quit
Quits IRC
/msg nick message
Sends a private message to the nick you specify
If you need to know how to do something else, the best way learn how is to ask in the #help channel.
Automating Your Connection
One of the most useful features of mIRC is buried in the options menu. Usually when you log into IRC, there's a few things you want to do - set your nick, identify yourself to nickserv, and join one or more channels. mIRC can let you do this automatically, if you set it up.
To do this, do the following steps.
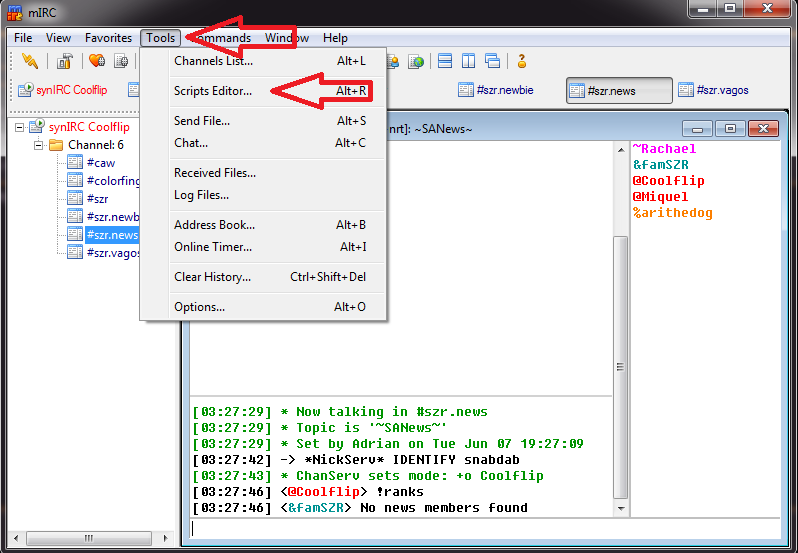
Open the options menu, it's under Tools | Options
Make sure the 'tree' under Connect is open, by clicking on the small + next to it
Choose the Options category, and do the following things:
Check the Connect on startup box
Check the Reconnect on disconnection box
Uncheck the Pop up connection dialogue on startup box
Check the Move to top of list on connect box
Now open the IRC tree, by clicking on the small +
Choose the Perform category, and do these things:
Check the On connect, perform these commands box
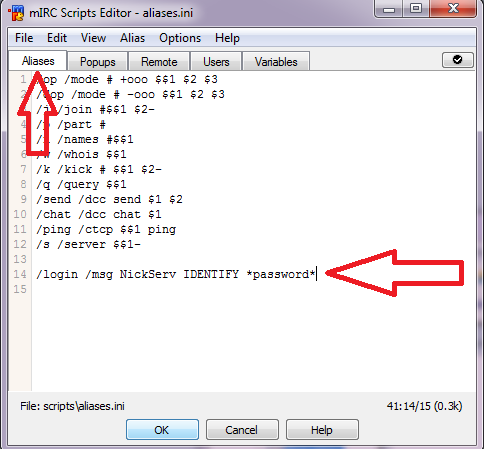
Fill in the box with the commands you would type at the beginning. It might look like this:
/nick YourNick
/msg nickserv id password
/join #SZR
And that's it! If you did everything correctly, next time you run the program you can just sit back (or wander off to get a drink), and before you know it you'll be identified and sitting in all your usual channels.
The End
And that's it, the things listed here should get you connected, running, and chatting with the least amount of frustration possible. If you have any other questions once you are connected, just type in /join #help to chat with a number of IRC pros who would be more than happy to help you. Or you can go visit IRChelp.org.
Tutorial mostly stolen from http://www.escapistmagazine.com/chat
What is IRC?
IRC stands for "Internet Relay Chat", and is used to represent chatroom networks where people from all over can get together. Many networks have multiple servers, giving the users multiple sites to connect from. To connect, you need an IRC client, of which there are many. This tutorial is about mIRC, a shareware program. After a month you'll need to click past annoying "buy me" menus but it will still function. There are other IRC clients you can use.
Why IRC?
Sometimes less is more. IRC has been around for over a decade and will probably stick around for a lot longer because it uses so few of your computer's resources. This means most users leave it running as long as their computer is on, and people can chat live or in effect "leave messages" for others to read later.
How to Install mIRC
Installing mIRC is simple. Simply download the file from http://www.mirc.com and run it. The install file asks you for the directory, defaulting to C:\Program Files\mIRC, and that's it! Everything else is automated. If it seems too complicated for you then following will help you.
But if it seems too complicated for you then following will help you.
Connecting to IRC
Connecting to IRC is almost as easy as installing it. When you first run the program, the options window pops up with a small form to fill out.
In the box where it says Full Name, just enter your first name, or perhaps a character name. This isn't displayed, but it's a good precaution to not put much personal information into these windows. The same carries for the E-Mail Address box.
Finally, you have the Nickname and Alternative boxes. These are what control the name you appear as, so pick whatever you want. If someone already has the nickname you put in the first box, mIRC will try to set you to the alternative. If neither work, it will prompt you for a different nickname.
At the bottom of the menu is a checkbox labelled Invisible Mode. Basically, this has to do with people being able to check if you're connected without knowing your nickname, like listing all the nicknames on the server. We suggest you put a check in this box, just for privacy and security.
Click OK to get out of this menu.
Now you'll be staring at a window that is prompting you for a command. This is called the Status window (or Server window once you connect)
Type /server irc.synirc.net to connect to the correct IRC server. You'll see a lot of messages produced by IRC and some sent by the server to you as the "message of the day" if you connect.
You may also get this:
Uncheck "pop up on connect" and hit OK to get rid of it.
Now that you're connected, if you want to see a listing of the channels currently open, type in /list , but since you already know the channel name, you don't have to do that. The command to join a channel is /join #Channel Name. Remember the pound sign # as all channels are preceded by this.
Try it out by typing /join #SZR
If you try to join a channel that doesn't exist (has 0 members) the channel is created for you. You can use this to make a new channel to chat in, and invite others to come chat with you.
Nickserv
synIRC has a feature called Nickserv, which allows you to 'register' your nickname, so nobody else can use it. The command to do this is /msg nickserv register password email . It's important to use a password you'll remember, and to put in a real email address. You'll need to check your email and verify your address to finish registration, and if you forget your password, they'll use that email address to send you a reminder.
Once you register your nickname, you'll have to identify yourself every time you log in or change your nickname to the registered one. The command to do that is /msg nickserv identify password . Once you do that, you'll get a message that tells you you've been identified.
To prevent the nickserv from becoming filled with unused old names, if you don't log on for an extended time span there's a good chance that your nickname will be reclaimed, and you'll have to register it again.
Other Useful Commands
IRC has a vast range of commands and abilities, but most of them aren't needed by most of us. There are a few that are important to know though, and you might find yourself using a lot.
/me does stuff
It's like an IRC emote. * Virgil throws a large rock at Marduk
/nick nickname
Changes your nickname
/part
Leaves the channel you type it in
/quit
Quits IRC
/msg nick message
Sends a private message to the nick you specify
If you need to know how to do something else, the best way learn how is to ask in the #help channel.
Automating Your Connection
One of the most useful features of mIRC is buried in the options menu. Usually when you log into IRC, there's a few things you want to do - set your nick, identify yourself to nickserv, and join one or more channels. mIRC can let you do this automatically, if you set it up.
To do this, do the following steps.
Open the options menu, it's under Tools | Options
Make sure the 'tree' under Connect is open, by clicking on the small + next to it
Choose the Options category, and do the following things:
Check the Connect on startup box
Check the Reconnect on disconnection box
Uncheck the Pop up connection dialogue on startup box
Check the Move to top of list on connect box
Now open the IRC tree, by clicking on the small +
Choose the Perform category, and do these things:
Check the On connect, perform these commands box
Fill in the box with the commands you would type at the beginning. It might look like this:
/nick YourNick
/msg nickserv id password
/join #SZR
And that's it! If you did everything correctly, next time you run the program you can just sit back (or wander off to get a drink), and before you know it you'll be identified and sitting in all your usual channels.
The End
And that's it, the things listed here should get you connected, running, and chatting with the least amount of frustration possible. If you have any other questions once you are connected, just type in /join #help to chat with a number of IRC pros who would be more than happy to help you. Or you can go visit IRChelp.org.
Tutorial mostly stolen from http://www.escapistmagazine.com/chat
